Sun Salutation: The Best Warm-Up Part 2
Last week I have posted the first 5 positions read here if you haven’t yet. Today, I reveal the rest of the positions.
- Position 6: Bhujangasana/Cobra Pose
Inhale and straighten your arms, palms on the floor, keep the shoulders down, the toes and knees on the floor. Keep the heels, legs and knees together, toes erect. Bring the neck upwards, open the chest and bring it forward. Either gaze forward or look up by gently tilting your head back. Make sure you do not hunch the shoulders towards the ears and the legs or heels apart!
 Benefits: Relieves lower back pain especially caused by overworking or long hours of standing. Tones the abdominal muscles, ovaries and uterus and relieving menstrual problems. Relieves Asthma and other respiratory problems. Tones and massages the deep muscles of the spine. It increases the flexibility of the spine.
Beginner’s variation – Sphinx: Use this variation if you are new to yoga, have back problems or your spine is not supple. Bend your arms, palms on the floor, keep your shoulders down and elbows tucked under the shoulders.
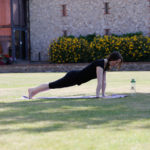
- Position 7: Downward Facing Dog or just Down Dog
Hold the breath or Exhale and push your body backwards by raising the waist upwards and pushing your tailbone/coccyx out. So, the buttocks are raised into the air, leaving the body in an inverted “V” shape position. Press the palms into the floor, straighten the arms and try to touch the heels to the floor.
Benefits: It stretches the lower back muscles, tones the spine and opens shoulders. It strengthens the nerves, muscles of the arms and legs.
Beginner’s variation: Bend your legs if your hamstrings are tight and your buttocks upwards to the air. Keep your arms and back straight.
- Position 8: Low Lunge Pose, variation
Inhale and bring the left leg to the front and place it between your hands just like in position 3. Ensure the right knee touches the floor and toes erect. Press the waist downwards, hips towards the floor and keep your neck straight. Open your chest by bringing it forward and push your shoulders down. Make sure both arms are straight, palms or just fingertips on the floor. Keep your left leg bent, in a 90-degree angle to prevent knee pain!
 Benefits: It tones the abdomen and the muscles of the thighs. It opens the groins and hips, making them flexible.
Beginner’s variation: Coming from the previous pose – down dog – first move your left leg half way forward, bring your right knee down on the floor and with a help of your left hand drag your left foot forward between your hands.
- Position 9: Standing Forward Bend
Exhale and bring the right leg forwards as in position 2 by placing it between your hands if you can reach. Do not worry if you cannot touch your toes yet, it will come soon with practice. 😉 Keep your legs straight and try to touch the forehead to the knees without bending them, relax your neck.
- Position 10: Standing Position
Standing pose with your back and neck erect, hands joined together near chest and feet together as well.
Benefits of this pose: Establishing a state of concentration and calmness
You can also use this intermediate variation – Inhale and stretch your arms up and slightly back, tilt your head back as well. Be careful not to overdo or lose balance.
Benefits: Stretching arms, strengthening abdominal and neck muscles. A great chest opening exercise, great for heart chakra and respiratory system.
 Please note: To achieve all these health benefits, you will need to practice according to your own ability on a regular basis. Always listen to your body and never push to maximum otherwise you may cause harm such as strain muscles, shoulder/hip/knee/joint or back pain…
After practising yoga: Ensure you drink some pure water, possibly eat a light meal (fresh fruits or veg, salad or natural snack bar) and have a rest to enhance the benefits. 😊
Here is the video of all 10 poses:
 Previous Post
 Next Post